Introduction
FOP2 panel lets you see detailed PBX activity, like who is talking and to whom, call durations, held calls, queued calls, etc. It lets you control your phone and perform transfers, launch call spying and whisper, monitor queue activity and more. All from your web browser, without the need to install anything on the client side. It can show any number of lines per phone and held call status, so you can see exactly what is going on.
The software is a web based switchboard for the open source projects Asterisk PBX. It consists of two components, a server side that runs in your dedicated server, and a web application that is served by your web server. The server side will connect to the Asterisk Manager Interface (AMI) over port tcp/5038 and will be the mediator between Asterisk and the web clients.
So first you must have a Linux box ready with Apache, PHP and MySQL installed. You can use a virtual machine with at least 512Mb of RAM for that purpose. That should be enough for small/medium size call centers. If you have a large call center and have thousands of calls per day, then you need at least 2 GB or RAM.
In this guide, Linux server (Centos) has the IP address 192.168.9.225 and the Yeastar S PBX has the IP address 192.168.9.68.
Server Requirements
- 32 or 64 bits Linux Operating System
- PHP 5.1 or higher
- MySQL Server 5 or higher, or MariaDB
- A web server(Apache/Nginx)
Client Requirements
- Modern Web Browser (IE10 or above, Google Chrome, Safari, Firefox, Opera)
- Javascript enabled
- Adobe Flash Player (for recording playback or lack of websocket support in browser)
Step One — Install Apache
1.1 Install web server
[root@localhost ~]# sudo yum -y install httpd1.2 Start apache server
[root@localhost ~]# sudo systemctl start httpd.service
1.3 Disable firewall
[root@localhost fop2]# iptables -F1.4 Start apache on reboot
[root@localhost fop2]# sudo systemctl enable httpd.serviceStep Two — Install MySQL (MariaDB)
2.1 Install mariadb
[root@localhost fop2]# sudo yum install mariadb-server mariadb2.2 Start database
[root@localhost fop2]# sudo systemctl start mariadb2.3 Now that our MySQL database is running, we want to run a simple security script that will remove some dangerous defaults and lock down access to our database system a little bit. Start the interactive script by running:
[root@localhost fop2]# sudo mysql_secure_installationThen the prompt will ask you for your current root password. Since you just installed MySQL, you most likely won’t have one, so leave it blank by pressing enter. Then the prompt will ask you if you want to set a root password. Go ahead and enter Y, and follow the instructions:
Enter current password for root (enter for none):
OK, successfully used password, moving on...
Setting the root password ensures that nobody can log into the MariaDB
root user without the proper authorization.
New password: password
Re-enter new password: password
Password updated successfully!
Reloading privilege tables..
... Success!
For the rest of the questions, you should simply hit the "ENTER" key through each prompt to accept the default values. This will remove some sample users and databases, disable remote root logins, and load these new rules so that MySQL immediately respects the changes we have made.
2.4 Enable MariaDB start on boot
[root@localhost fop2]# sudo systemctl enable mariadb.serviceStep Three — Install PHP
3.1 Install PHP and php-mysql package
[root@localhost fop2]# sudo yum install php php-mysql3.2 Restart apache server
[root@localhost fop2]# sudo systemctl restart httpd.service3.3 Test php file via http://your_server_IP_address/phpinfo.php
[root@localhost fop2]#  vi /var/www/html/phpinfo.php
<?php

        phpinfo();

?>
Only if it could see below informations, then php is installed successfully.

If you are running a firewall, run the following commands to allow HTTP and HTTPS traffic:
sudo firewall-cmd --permanent --zone=public --add-service=http
sudo firewall-cmd --permanent --zone=public --add-service=https
sudo firewall-cmd –reload
Step Four — Installing FOP2 on Linux Server
4.1 Keep in mind you need to download corresponding version from fop2 official website as per your linux system version. In this guide, we download the free version fop2-2.31.27-centos-x86_64.tgz.
[root@localhost ~]# cd /usr/src
[root@localhost src]# wget http://www.fop2.com/download/centos64/
[root@localhost src]# tar zxvf fop2-2.31.27-centos-x86_64.tgz
[root@localhost src]# ls
debug  fop2  fop2-2.31.27-centos-x86_64.tgz  kernels
4.2 Make and install
[root@localhost src]# cd fop2/
[root@localhost fop2]# make install
4.3 Installed successfullly, system will generate all requested files under installation folder and web access folder, any files pending to be configured are from both folders.
Below shows documentations under installation directory.
[root@localhost fop2]# cd /usr/local/fop2/
[root@localhost fop2]# ls -al
total 11932
drwxrwxr-x.  4 root apache     4096 Nov 22 20:29 .
drwxr-xr-x. 13 root root       4096 Nov  8 18:49 ..
-rwxr-xr-x.  1 root root       5376 Nov  8 18:49 astcli
-rw-r--r--.  1 root root         31 Nov  8 18:49 autobuttons.cfg
-rwxr-x--x.  1 root root       7789 Nov  8 18:49 autoconfig-buttons.sh
-rwxr-x--x.  1 root root      12713 Nov  8 18:49 autoconfig-users.sh
-rwxr-x--x.  1 root root       9291 Nov  8 18:49 autofill-groups.sh
-rw-r--r--.  1 root root       3098 Nov 21 19:58 buttons_custom.cfg
-rw-r--r--.  1 root root       1362 Nov  8 18:49 buttons_custom.cfg.sample
-rw-r--r--.  1 root root      12288 Nov 20 16:45 .buttons_custom.cfg.swp
drwxr-xr-x.  2 root root         33 Nov  8 18:49 config_generators
-rw-r--r--.  1 root root        123 Nov  8 18:49 extensions_override_freepbx.con                                                                                                                                                              f
-rw-r--r--.  1 root root       3871 Nov  8 18:49 FOP2Callbacks.pm
-rw-r--r--.  1 root root      15951 Nov 22 20:29 fop2.cfg
-rwxr-x--x.  1 root root   12043533 Nov  8 18:49 fop2_server
-rw-rw-rw-.  1 root root      19456 Nov 22 20:24 fop2settings.db
-rwxr-x--x.  1 root root      10057 Nov  8 18:49 generate_override_contexts.pl
-rwxr-xr-x.  1 root root       4869 Nov  8 18:49 recording_cdr.pl
-rwxr-xr-x.  1 root root       5015 Nov  8 18:49 recording_elastix.pl
-rwxr-xr-x.  1 root root       7279 Nov  8 18:49 recording_fop2.pl
-rwxr-x--x.  1 root root        515 Nov  8 18:49 setSSL.sh
drwxr-xr-x.  3 root root         21 Nov 22 18:07 temp
-rwxr-xr-x.  1 root root       6271 Nov  8 18:49 tovoicemail.pl
[root@localhost fop2]#
Below shows documentations under web access directory.
[root@localhost html]# cd /var/www/html/fop2/
[root@localhost fop2]# ls -al
total 308
drwxr-xr-x. 11 root   root    4096 Nov 22 20:12 .
drwxr-xr-x.  3 root   root      52 Nov 22 21:38 ..
drwxr-xr-x. 11 apache apache  4096 Nov 21 21:33 admin
drwxr-xr-x.  2    500    500  4096 Sep  9  2017 audio
-rw-r--r--.  1    500    500 14929 Sep  1  2018 calldetailrecords.php
-rw-r--r--.  1    500    500 12437 Sep  9  2017 chatadmin.php
-rw-r--r--.  1    500    500  4181 Nov 21 14:19 checkdir.php
-rw-r--r--.  1    500    500  5087 Nov 21 21:32 config.php
-rw-r--r--.  1    500    500 25970 Jun 30  2018 contacts.php
drwxr-xr-x.  5    500    500  4096 May 30 04:55 css
-rw-r--r--.  1    500    500  7005 Sep  9  2017 downloadOdbc.php
-rw-r--r--.  1    500    500  6187 Sep  9  2017 download.php
-rwxr-xr-x.  1    500    500 29142 Sep  9  2017 flashmediaelement.swf
drwxr-xr-x.  2    500    500  4096 Sep  9  2017 fonts
-rw-r--r--.  1    500    500  3900 Sep  9  2017 fop2.swf
-rw-r--r--.  1 root   root      19 Nov 22 18:08 fop2-variablesGENERAL.txt
-rw-r--r--.  1    500    500   198 Sep  9  2017 .htaccess
drwxr-xr-x.  3    500    500  4096 Sep  9  2017 images
-rw-r--r--.  1    500    500 43311 May 21  2019 index.html
drwxr-xr-x.  2    500    500  4096 Nov 21 19:45 js
-rw-r--r--.  1    500    500 34014 Sep  9  2017 JSON.php
drwxr-xr-x.  2    500    500  4096 May 30 04:57 lang
drwxr-xr-x.  2    500    500    89 Aug 10  2018 lib
-rw-r--r--.  1    500    500  9748 Sep  9  2017 recordings.php
-rw-r--r--.  1    500    500  2540 Nov  5 05:54 setvar.php
-rw-r--r--.  1    500    500 12461 Sep  9  2017 silverlightmediaelement.xap
drwxrwx--x.  2 apache apache     6 Nov  5 05:54 uploads
-rw-r--r--.  1    500    500  3746 Jun 30  2018 vphonebook.php
-rw-r--r--.  1    500    500 21241 Sep  9  2017 wavplayer.swf
[root@localhost fop2]#
Step Five — Configure AMI interface
5.1 Enable AMI in S series PBX.
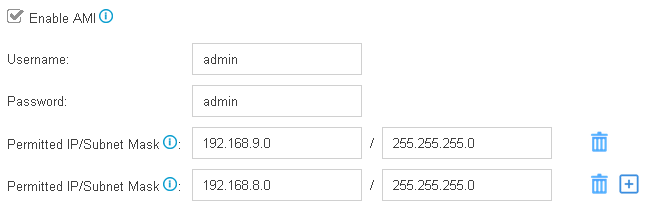
5.2 Configure AMI definitions on server to match the same in PBX.
[root@localhost fop2]# vi /usr/local/fop2/fop2.cfg
[general]
; AMI definitions
manager_host=192.168.9.68
manager_port=5038
manager_user=admin
manager_secret=admin
...
use_pickupchan=1
...
5.3 Check if the manager credentials are correctly configured by running below command.
[root@localhost fop2]# /usr/local/fop2/fop2_server --test
Flash Operator Panel 2 - License file /usr/local/fop2/fop2.lic not found.
Running in Demo Mode
Connection to manager OK (020800)!
5.4 Enable fop2 service.
[root@localhost src]# service fop2 start
Starting fop2 (via systemctl):                             [  OK  ]
5.5 Configure users for web login.
5.5.1 Add users, format: user=[EXTENSION]:[SECRET]:[PERMISSIONS]:[GROUPS], EXTENSION should be from PBX.
5.5.2 Cancel comment line buttonfile=buttons_custom.cfg.
5.5.3 Comment line #exec autoconfig-users.sh.
[root@localhost ~]# vi /usr/local/fop2/fop2.cfg
...
user=5678:5678:all
user=5679:5679:all
user=5680:5680:all
user=5681:5681:all
user=5682:5682:dial,transfer,spy,hangup,pickup,record:teamA
user=5683:5683:all
user=5684:5684:all
user=5685:5685:all
user=5686:5686:all
user=5687:5687:all
user=5688:5688:all
user=5689:5689:all
user=5690:5690:all
user=5698:5698:all
buttonfile=buttons_custom.cfg
...
;#exec autoconfig-users.sh
The complete list of permissions is:
- all: shortcut for specifying ALL permissions
- dial: for performing dials and originate calls
- hangup: for hanging up any call
- meetme: for meetme actions (mute/unmute/lock)
- pickup: for picking up ringing calls
- record: for starting or stopping call recording
- spy: for launching spy or whisper sessions
- transfer: for performing transfers and transfers to voicemail
- transferexternal (2.24): for performing transfers to external numbers
- queuemanager (2.10): lets you add/remove/pause any queue member dynamically
- queueagent (2.10): lets you add/remove/pause yourself to any queue
- phonebook (2.10): lets you use the phonebook for adding/removing entries
- hangupself (2.20): for hanging up only your own extension calls
- recordself (2.20): for starting or stopping call recording on your own extension only
- chat (2.20): grants permissions to initiate chat to other users
- preferences (2.20): grants permissions to open up the personal preferences pane from the FOP2 UI
- voicemailadmin (2.20): grants permission to open voicemail explorer for any extension
- broadcast (2.27): grants permission to initiate broadcast chat or notes to extension groups
5.6 Restart FOP2 service.
[root@localhost ~]# systemctl restart fop2.service5.7 Add buttons, here button mostly means the menu you can see on web, one extension is one button, trunk menu is one button, queue menu is one button, etc. Free version limits upto 15 buttons, if you need more buttons you have to purchase license.
Remember you need to modify part details as per your PBX if you refer to below configurations.
[root@localhost fop2]# cp /usr/local/fop2/buttons_custom.cfg.sample buttons_custom.cfg
[root@localhost fop2]# vi /usr/local/fop2/buttons_custom.cfg
[PJSIP/5678]
type=extension
extension=5678
context=DLPN_DialPlan5678
label=5678name
mailbox=5678@default
extenvoicemail=**5678@default
channel=PJSIP/5678
external=2083621
external=tonnie@yeastar.com
autoanswerheader=__SIPADDHEADER51=Call-Info=answer-after=0.001
originatevariables=FROM_USER=23,OTHER_VARIABLE=test

[PJSIP/5679]
type=extension
extension=5679
context=Local_Default_CallingRules
label=5679name
mailbox=5679@default
extenvoicemail=**5679@default
channel=PJSIP/5679
autoanswerheader=__SIPADDHEADER51=Call-Info=answer-after=0.001
originatevariables=FROM_USER=23,OTHER_VARIABLE=test
queuecontext=queue

[PJSIP/5680]
type=extension
extension=5680
context=Local_Default_CallingRules
label=5680name
mailbox=5680@default
extenvoicemail=**5680@default
channel=PJSIP/5680
autoanswerheader=__SIPADDHEADER51=Call-Info=answer-after=0.001
originatevariables=FROM_USER=23,OTHER_VARIABLE=test
queuecontext=queue


[PJSIP/5681]
type=extension
extension=5681
context=Local_Default_CallingRules
label=5681name
mailbox=5681@default
extenvoicemail=**5681@default
channel=PJSIP/5681
autoanswerheader=__SIPADDHEADER51=Call-Info=answer-after=0.001
originatevariables=FROM_USER=23,OTHER_VARIABLE=test
queuecontext=queue


[PJSIP/5682]
type=extension
extension=5682
context=Local_Default_CallingRules
label=5682name
mailbox=5682@default
extenvoicemail=**5682@default
channel=PJSIP/5682
autoanswerheader=__SIPADDHEADER51=Call-Info=answer-after=0.001
originatevariables=FROM_USER=23,OTHER_VARIABLE=test
queuecontext=queue

[PJSIP/5683]
type=extension
extension=5683
context=Local_Default_CallingRules
label=5683name
mailbox=5683@default
extenvoicemail=**5683@default
channel=PJSIP/5683
autoanswerheader=__SIPADDHEADER51=Call-Info=answer-after=0.001
originatevariables=FROM_USER=23,OTHER_VARIABLE=test
queuecontext=queue

[DAHDI/5]
type=extension
extension=5684
context=DLPN_DialPlan5684
label=analog1
mailbox=5684@default
extenvoicemail=**5684@default
channel=PJSIP/5684
autoanswerheader=__SIPADDHEADER51=Call-Info=answer-after=0.001
originatevariables=FROM_USER=23,OTHER_VARIABLE=test
group=analog phone

[PJSIP/5698]
type=extension
extension=5698
context=DLPN_DialPlan5698
label=tonnie4
mailbox=5698@default
extenvoicemail=**5698@default
channel=PJSIP/5698
autoanswerheader=__SIPADDHEADER51=Call-Info=answer-after=0.001
originatevariables=FROM_USER=23,OTHER_VARIABLE=test
queuecontext=queue

[DAHDI/8]
type=extension
extension=5685
context=DLPN_DialPlan5685
label=analog2
mailbox=5685@default
extenvoicemail=**5685@default
group=analog phone

[QUEUE/queue-6705]
type=queue
label=support
extension=6705
context=queues


[RINGGROUP/6205]
type=ringgroup
label=sales
extension=6205
context=Local_Default_CallingRules


[CONFERENCE/6405]
type=conference
label=Test Conference
extension=6405
context=Local_Default_CallingRules


[PJSIP/trunk-9196-endpoint]
type=trunk
label=SIPtrunkTO196
channel=PJSIP/trunk-9196-endpoint
context=Local_Default_CallingRules

[DAHDI/6]
type=trunk
label=PSTNto208
channel=DAHDI/6
context=Local_Default_CallingRules

[PARK/default]
label=Park
type=park
extension=6900
context=parkedcalls
5.8 Restart FOP2 service.
[root@localhost ~]# systemctl restart fop2.service5.9 User login.
Login address: http://your_server_IP_address/fop2
Login username: EXTENSION defined in file /usr/local/fop2/fop2.cfg
Login password: SECRET defined in file /usr/local/fop2/fop2.cfg
Here we have made some calls in PBX and PBX pushed call details via AMI to fop2 server so you will be able to see the activity details in PBX.
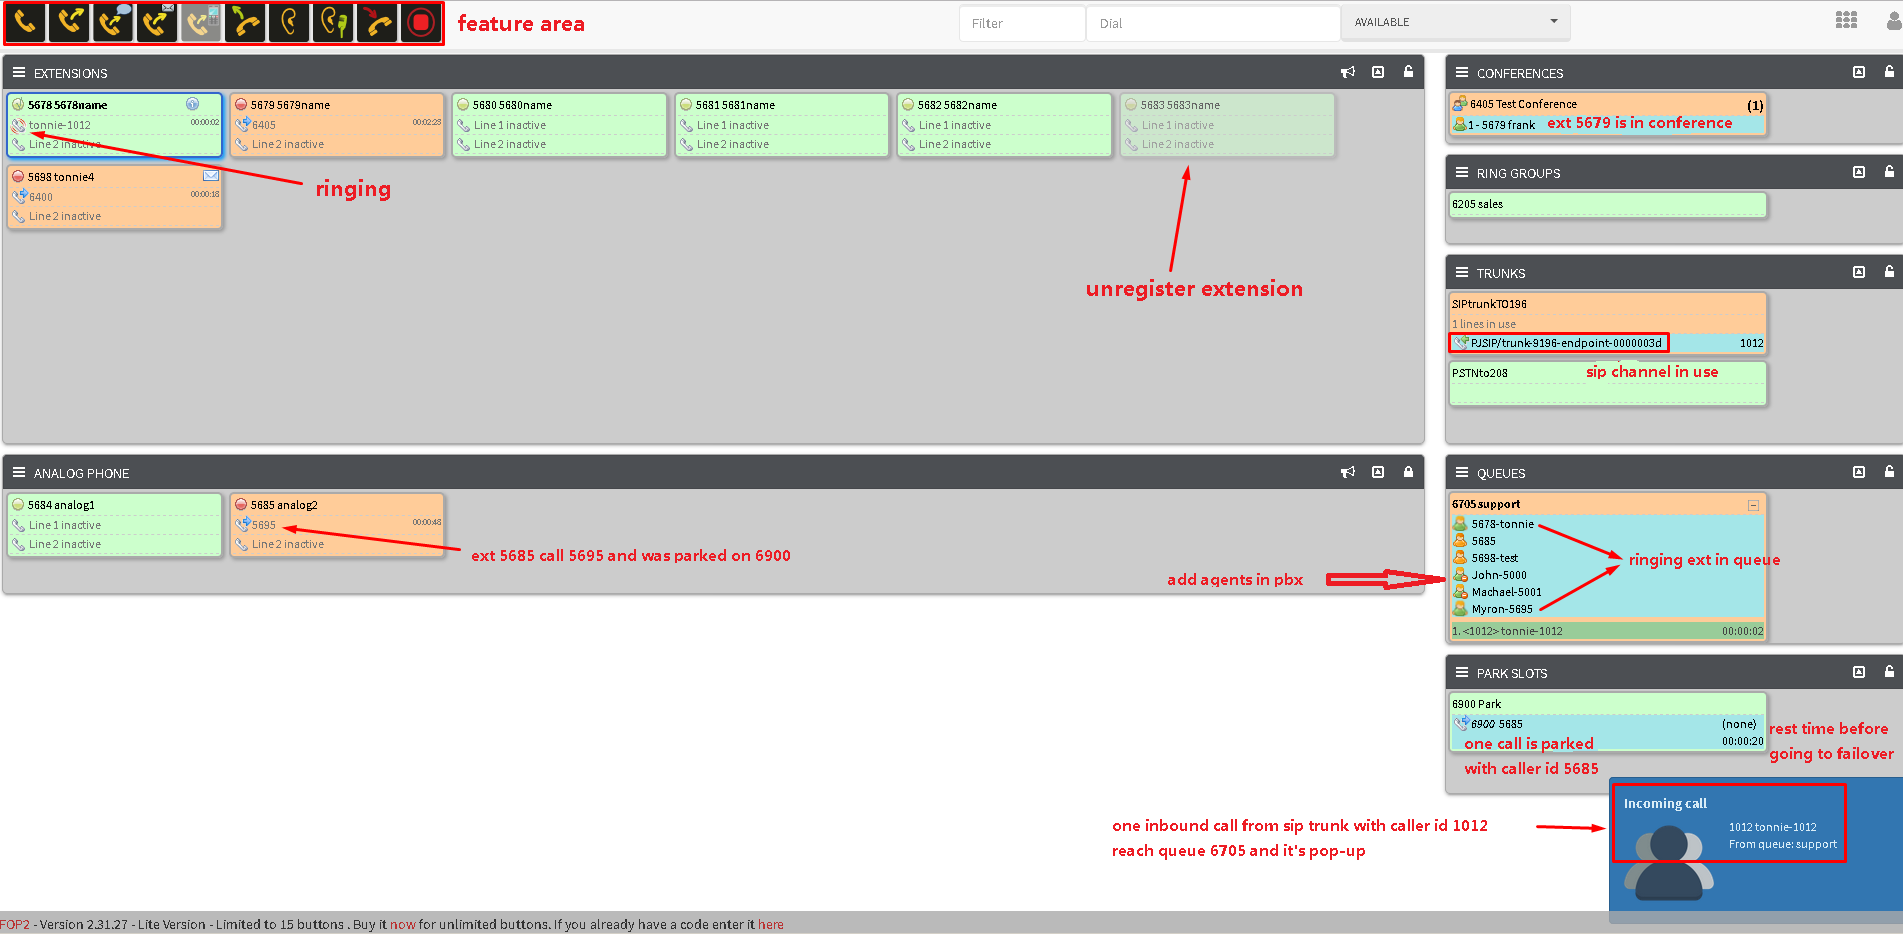
6.0 Login for the first time you might see buttons in feature area are all grey but they work fine. Here we share the coding to make it colorful and realistic.
[root@localhost mail]# vi /var/www/html/fop2/css/custom_theme/theme.css
.fop2-dial::before{
content:"";
background: url(../../images/toolbar/llamar.png) no-repeat;
width:40px;
height:40px;
top:8px;
left:2px;
position:absolute;
}
.fop2-transfer::before {
content:"";
background: url(../../images/toolbar/transferir.png) no-repeat;
width:40px;
height:40px;
top:8px;
left:46px;
position:absolute;
}
.fop2-supervised_transfer::before{
content:"";
background: url(../../images/toolbar/supervised_transfer.png) no-repeat;
width:40px;
height:40px;
top:8px;
left:90px;
position:absolute;
}
.fop2-vmail_transfer::before{
content:"";
background: url(../../images/toolbar/transferir_a_voicemail.png) no-repeat;
width:40px;
height:40px;
top:8px;
left:134px;
position:absolute;
}
.fop2-mobile_transfer::before{
content:"";
background: url(../../images/toolbar/transferir_a_movil.png) no-repeat;
width:40px;
height:40px;
top:8px;
left:178px;
position:absolute;
}
.fop2-pickup::before {
content:"";
background: url(../../images/toolbar/pickup.png) no-repeat;
width:40px;
height:40px;
top:8px;
left:222px;
position:absolute;
}
.fop2-spy::before{
content:"";
background: url(../../images/toolbar/espiar.png) no-repeat;
width:40px;
height:40px;
top:8px;
left:266px;
position:absolute;
}
.fop2-whisper::before {
content:"";
background: url(../../images/toolbar/susurrar.png) no-repeat;
width:40px;
height:40px;
top:8px;
left:310px;
position:absolute;
}
.fop2-hangup::before {
content:"";
background: url(../../images/toolbar/cortar.png) no-repeat;
width:40px;
height:40px;
top:8px;
left:354px;
position:absolute;
}
.fop2-record::before {
content:"";
background: url(../../images/toolbar/record.png) no-repeat;
width:40px;
height:40px;
top:8px;
left:398px;
position:absolute;
}
Summary
For now we just finish integration with FOP2 panel and prove the possibility with Yeastar S series PBX. You might have to learn how to use the panel to make/receive calls yourself and explore advanced features, such as call history, recordings or phonebook, etc.

1 Comments