
Introduction
This guide shows how to connect Yeastar TA FXS gateway to TG gateway. This guide has been tested with TA800 and TG400.
Two modes are available to connect TA and TG:
- Port Register Mode
- Service Provider Mode.
*You can simply choose one mode to achieve the connection.
Target:
After connecting TA800 and TG400, FXS extensions will be extended on TG. After connecting TA800 and TG400, you can do the following:
1. Receive inbound calls on the analog phone from GSM trunk on TG Gateway.
2. Make outbound calls from the analog phones using trunks on TG Gateway.
Description:
IP address of TG400: 192.168.6.233, Firmware version: 53.18.0.45.
IP address of TA800: 192.168.6.229, Firmware version: 41.19.0.16.
Preparation
TA FXS Gateway (TA800 in this Guide) attempts to contact a DHCP server in your network to obtain valid network settings (e.g., the IP address, subnet mask, default gateway address and DNS address) by default.
Before connecting TA800 to TG400, we recommend you set a static IP for TA800 to ensure stable connection.
Steps to set static IP for TA800:
1. Connect one analog phone to first FXS ports on TA800;
2. Dial "***" to enter the voice menu;
3. Press "1" to check the IP address;
4. Open the browser and type in the TA800's IP address to access TA800;
5. Log in TA800 and go to System→Network Preferences→LAN Settings, disable DHCP and choose Static IP Address mode, configure the LAN network, save and apply the changes, reboot TA800 to take effect.

Figure 1
Install SIM Card on TG400
There are 4 GSM slots in front panel which support you hot-plug the GSM card. You can insert GSM cards into the slot. Then you should reboot the GSM module manually by go to the page Gateway -> Mobile List -> Mobile List, and click accordingly Reboot button.
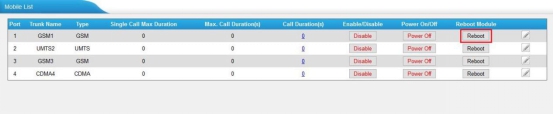
Figure 2
After you reboot the GSM module, the GSM card will be activated, Then check the GSM status in Status -> System Status -> Trunk Status, as you can see, the GSM status will be Idle for use.
 Figure 3
Port Register Mode
If you choose Port Register mode, the FXS ports will be registered as the TG400's SIP Account.
Here we create 4 different SIP accounts on TG400 and register 4 FXS ports to the 4 SIP accounts. Analog phones connected to the 4 FXS ports on TA800 would be able to make and receive calls through the GSM trunks of TG400.
Step 1. Create SIP accounts in TG400
Path: Gateway -> VoIP Settings -> VoIP Trunk -> Add VoIP Trunk
Create a SIP account on TG400.Here we take account 20001 for example.
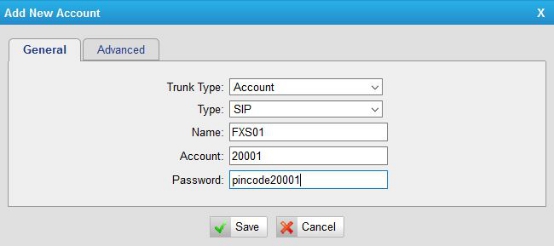
Figure 4
Click Save and apply changes,the account is created on TG400.
Create other 3 SIP accounts in the same way.
Step 2. Configure one VoIP server on TA800.
Path: Gateway→VoIP Settings→VoIP Server Settings.
There are 4 VoIP Server Templates, let’s edit the first one, make sure this VoIP server’s Register Mode setup as Port Register mode.

Figure 5
Server Name: TG400
Type: SIP
Transport: UDP
Hostname/IP: fill in the TG400 IP address, 192.168.6.233
Domain: fill in the TG400 IP address, 192.168.6.233
Register Mode: Port Register
Step 3. Edit the Dial Pattern Template
Path: Gateway→VoIP Settings→Dial Pattern Template
The default dial pattern is set as ".", which allows you to dial any number out. In this guide, we will remain the default setting. You can change it according to your environment.
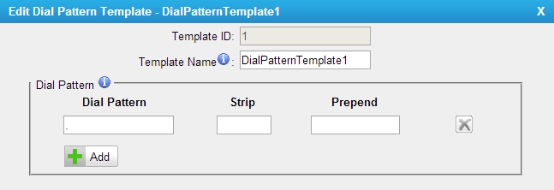
Figure 6
Step 4. Register FXS Port to TG400.
Path: Gateway→Port List→Port List
Here we register FXS port 1 to SIP account 20001(which was created on TG400).

Figure 7
Caller ID Number: the SIP account number as the one you created on TG400, 20001.
VoIP Server: choose TG400(1), the VoIP server template configured in Step 2.
User Name: the SIP Account username on TG400, 20001.
Authentication Name: the authentication name on TG400, 20001.
Password: the authentication password of the SIP Account on TG400, pincode20001.
Dial Pattern Template: choose the Dial Pattern Template, DialPatternTemplate1(1).
DID Number: The SIP account number on TG400, 20001.
Save and apply the changes, and you will see the port status is “Registered” on "Port Status" page.
Path: Status→System Status→FXS Port Status
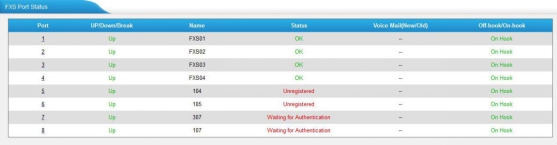
Figure 8
Now, you have registered FXS port 1 to SIP account 20001 on TG400.
Register other 3 FXS ports in the same way.
Step 5. Setup the IP to mobile route on TG400 for outgoing calls
To make outgoing calls through TG400, you need setup “IP to Mobile” route. Here we create one “IP to Mobile” route for the SIP account FXS01, allowing the account to make outgoing calls through GSM trunk1.
Path: Gateway -> Routes Settings -> IP to Mobiles -> Add IP to Mobile Route

Figure 9
Click Save and apply, the phone connected to FXS port 1 on TA800 would be able to make outgoing calls through GSM trunk 1.
You can assign GSM trunk 2 to SIP Account 20002 with the same method.
Step 6. Setup the Mobile to IP route on TG400 for incoming calls
To receive incoming calls, you need to setup “Mobile to IP” route on TG400.
Here we create one “Mobile to IP” route to route incoming calls from GSM trunk 1 to TA FXS port 1. When the call reaches the FXS port 1, the phone connected to the port would ring.
Path: Gateway -> Routes Settings -> Mobile to IP -> Add Mobile to IP Route

Figure 10
Service Provider Mode
If you choose Service Provider mode to connect TA800 and TG400, the FXS port will be registered as a Service Provider SIP/IAX (SPS/SPX) trunk to the TG. One SPS/SPX trunk to TA also should also be created on TG. In this guide, we use SIP protocol, configure one VoIP server as Service Provider mode on TA800 and create one Service Provider SIP trunk on TG400.
Step 1. Create a Service Provider VoIP server on TA800.
Service Provider mode means peer-to-peer connection. It is IP-based connection, and does not require TA800 to register with TG400. You need to create Service Provider VoIP server/trunk on both TA800 and TG400.
Path:Gateway -> VoIP SettingsVoIP Server Settings

Figure 11
Server Name: TG400
Type: SIP
Transport: UDP
Hostname/IP: fill in TG400's IP address, 192.168.6.233:5060
Domain: fill in TG400’s IP address.
Register Mode: Service Provider
Step 2. Assign FXS port on TA800 to the Service Provider VoIP Server.
Do not forget to set Caller ID Number and DID number for the FXS port, so that the TG400 would know where calls should be routed. Here we set the Caller ID Number and DID number as 20001.
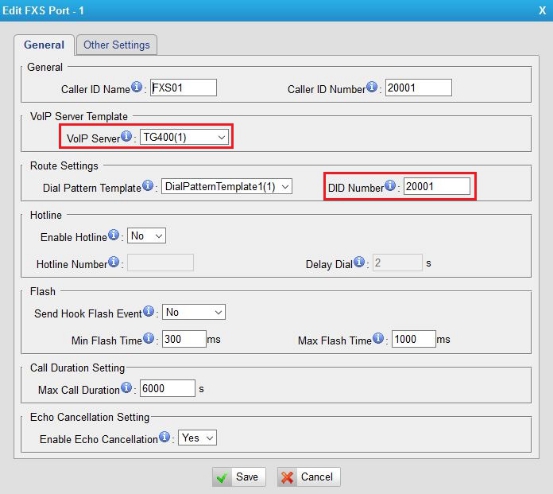
Figure 12
After finish the configurations, you can go to page Status -> System Status -> FXS Ports Status to check the status.

Figure 13
Step 3. Create a Service Provider VoIP Trunk on TG400
Path: Gateway -> VoIP Settings -> VoIP Trunk -> Add VoIP Trunk
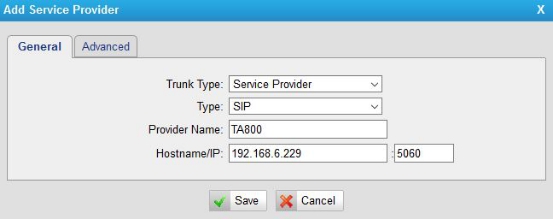
Figure 14
Trunk Type: Service Provider
Type: SIP
Provider Name: TA800
Hostname/IP: filled in TA800’s IP address: 192.168.6.229.
You can check the VoIP Trunk status via Status-> System Status -> Trunk Status.

Figure 15
Step 4. Setup IP to mobile route on TG400 for outgoing calls
To make outgoing calls through TG400, you need setup “IP to Mobile” route. Here we create one “IP to Mobile” route for the Service Provider trunk and choose one GSM trunk 1 to use.
Path: Gateway -> Routes Settings -> IP to Mobile-> Add IP to Mobile Route
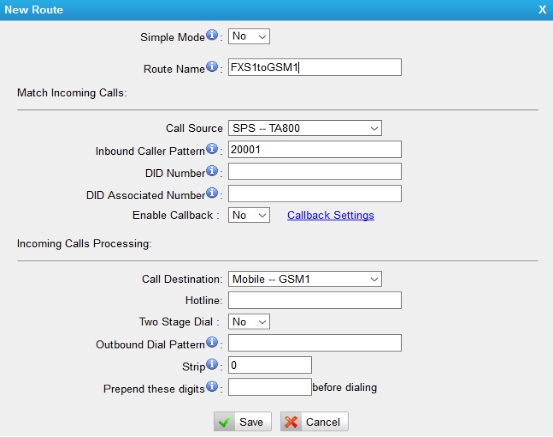
Figure 16
Simple Mode: No
Inbound Caller Pattern: the Caller ID of FXS1: 20001
Call Source: choose the VoIP Trunk which point to TA800: SPS -- TA800.
Call Destination: select Mobile -- GSM1.
Click Save and apply, now the analog phone connected to FXS1 can make outgoing calls through GSM trunk 1.
You can setup for other FXS ports in the same way.
Step 5. Setup Mobile to IP route on TG400 for incoming calls.
To receive incoming calls, you need to setup “Mobile to IP” route on TG400. Here we set incoming calls route to the Service Provider trunk.
Path: Gateway -> Routes Settings -> Mobile to IP -> Add Mobile to IP Route
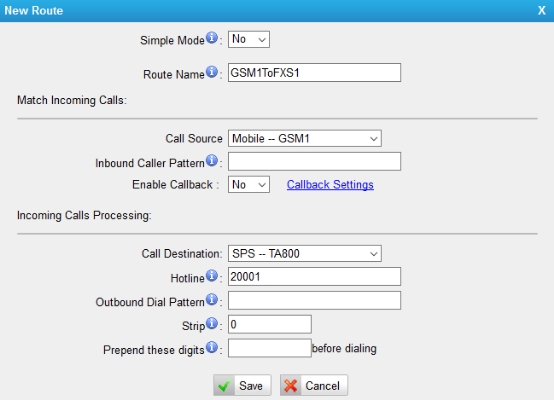
Figure 17
Simple Mode: No
Call Source: select Mobile -- GSM1
Call Destination: the VoIP trunk which connect to TA800 : SPS -- TA800
Hotline: the DID number of FXS1: 20001
Now incoming calls from GSM trunk 1 will reaches the analog phone connected to TA800 FXS port 1.
-END-
0 Comments