1. Introduction
The guide provides step-by-step configuration instructions of how to connect TA FXS gateway and Yeastar S-Series VoIP PBX. TA FXS gateway is used to expand the FXS extensions on S-series IPPBX. With the connection of TA FXS gateway and S-series IPPBX, you can achieve:
- Make calls between the analog phones and S-series IPPBX SIP extensions
- Receive inbound calls on the analog phones
- Make outbound calls from the analog phones using trunks on S-series IPPBX
- Make calls between analog phones
Integration Modes
There are three modes for TA FXS gateway to connect S-series IPPBX.
On TA FXS gateway, the register modes are as below:
Port Register
Service Provider
Template Register
*You can choose one of the modes to do the integration due to different scenarios.
Note:
Port register mode is the most popular feature in TAS gateway. With the connection of S-series PBX we often use port register mode.
Service provider mode is used in the integration scenario, for example two TAS gateway connection.
Template Register is often used in the scenario that the analog phone in the TAS gateway work as the ring group. Or all other devices connect to the TAS gateway use one SIP account.
Firmware version:
In the guide, we tested TA400 and S300.
TA400: 41.19.0.32
S300: 30.5.0.8
Description:
IP address of S300: 192.168.9.135
IP address of TA400: 192.168.9.64
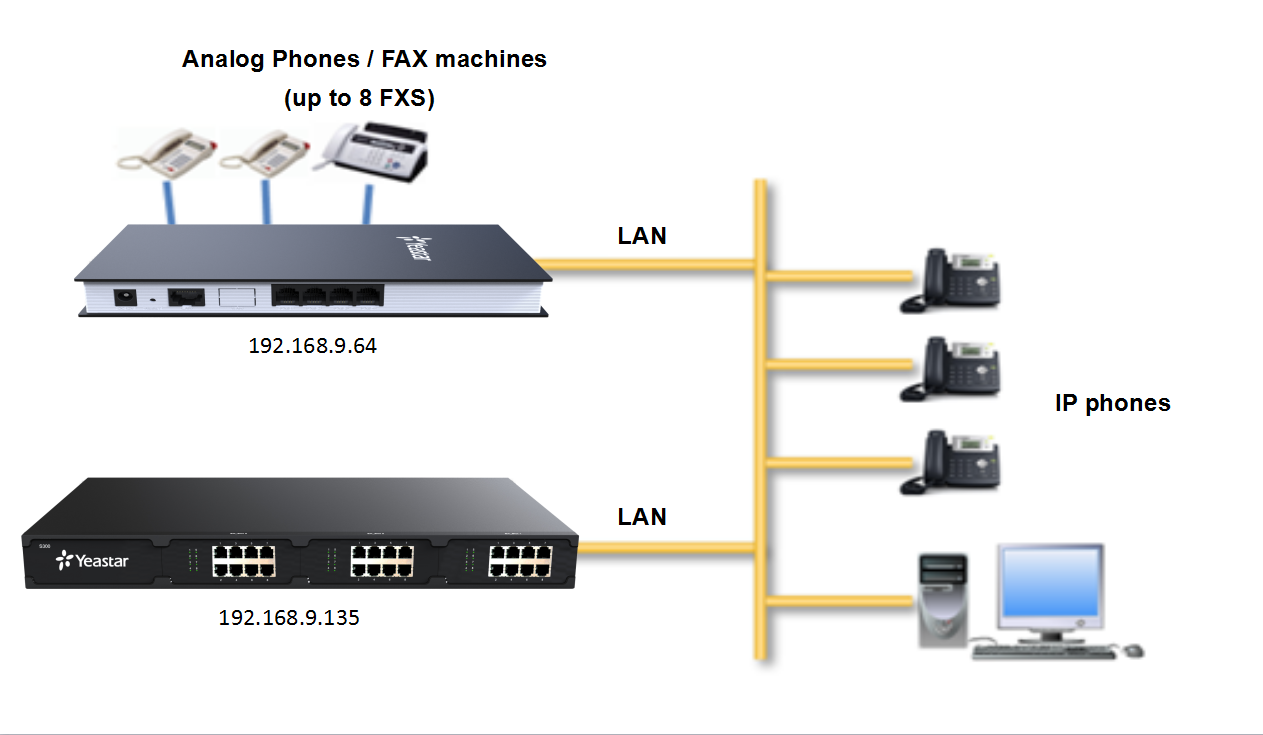
Figure 1. Connect S-series IPPBX and TA FXS gateway
2. Preparation
TA400 attempts to contact a DHCP server in your network to obtain valid network settings (e.g., the IP address, subnet mask, default gateway address and DNS address) by default.
Before connecting TA400 to S-series IPPBX, you need to set a static IP address from the same LAN with the S-series IPPBX.
Steps to set static IP for TA400:
- Connect one analog phone to one of the FXS ports on TA400;
- Dial "***" to enter the voice menu;
- Press "1" to check the IP address;
- Open the browser and type in the TA400's IP address to access TA400;
- Log in TA400 and go to System> LAN Settings> General Settings, disable DHCP and configure the LAN network, save and apply the changes, reboot TA400 to take effect.
Figure 2. Configure LAN Settings on TA400
3. Port register Mode
If you choose port register mode, the FXS ports will be registered as the S-series IPPBX's SIP extensions, which possess the same functions as other SIP extensions on S-series IPPBX.
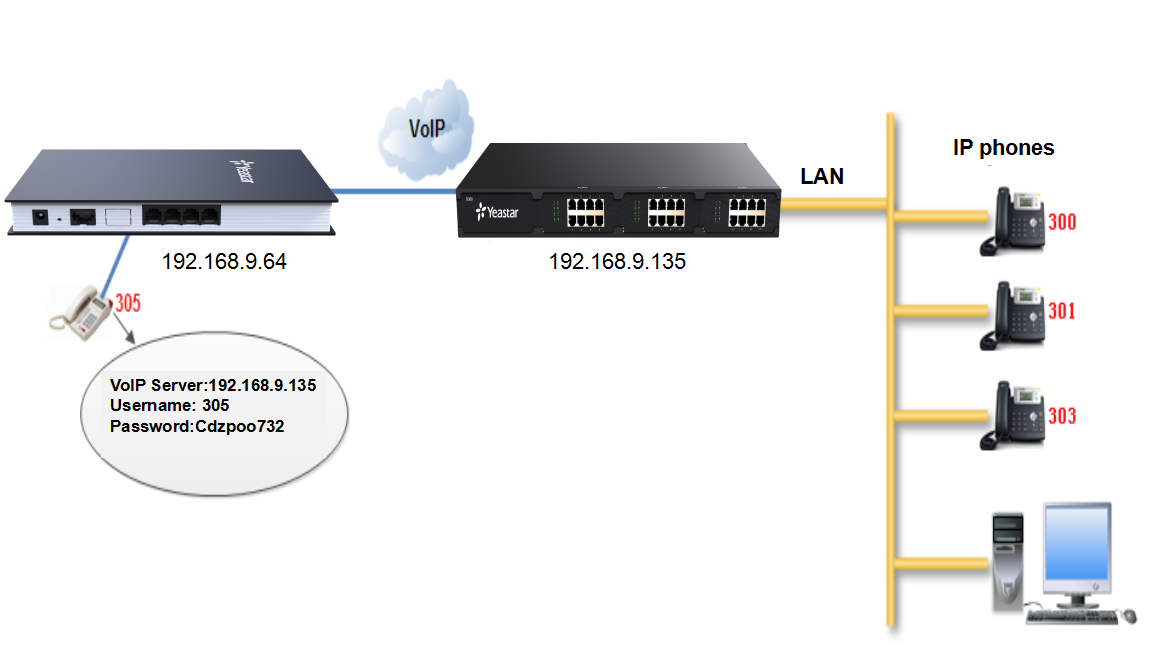
Figure 3. Connect TA400 and S-series IPPBX via VoIP Mode
Step 1. Create a SIP extension on S-series IPPBX.
Path: Settings> PBX> Extensions> Add
Create an extension on S-series IPPBX for the FXS port on the TA400 which has connected an analog phone. Here we take extension 1005 for example.
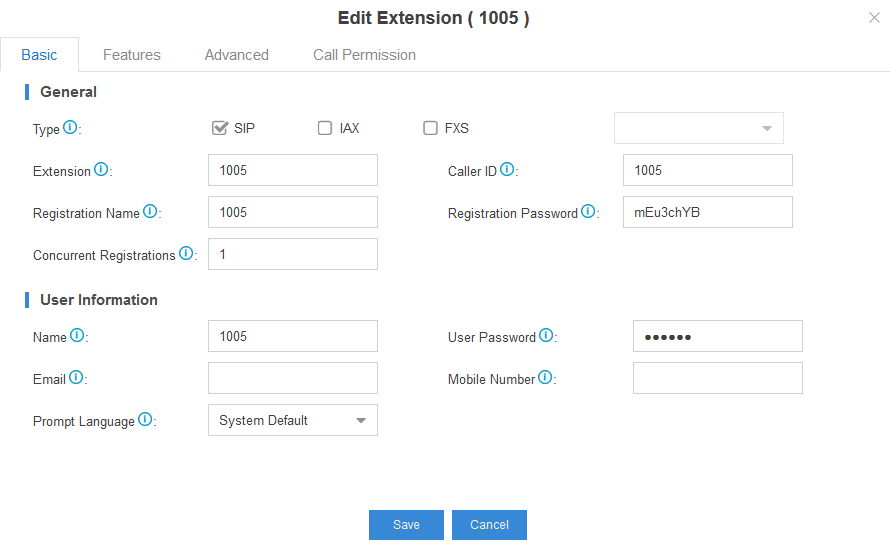
Figure 4. Create Extension 1005 on S300
Step 2. Configure one VoIP server settings on TA400.
Path: Gateway> VoIP Settings> VoIP Server Settings
Choose the “Register Mode” as “Port register” and fill in the Hostname/IP and Domain as the IP of S300
Figure 5. Configure the Register Mode as Port Register
Server Name: S300
Type: SIP
Transport: UDP
Hostname/IP: fill in the S-series IPPBX IP address, 192.168.9.135
Domain: fill in the S-series IPPBX IP address, 192.168.9.135
Register Mode: Port Register
Step 3. Edit the Dial Pattern Template
Path: Gateway> VoIP Settings> Dial Pattern Template
The default dial pattern is set as ".", which allows you to dial any number out. In this guide, we will remain the default setting. You can change it according to your environment.
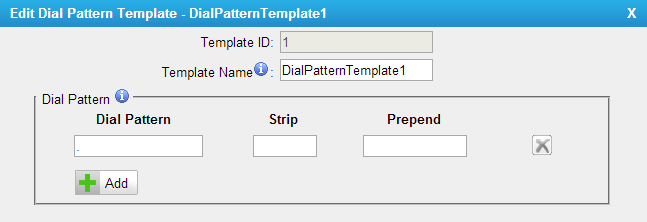
Figure 6. Edit Dial Pattern Template
Step 4. Edit the FXS port
Path: Gateway> Port List> Port List
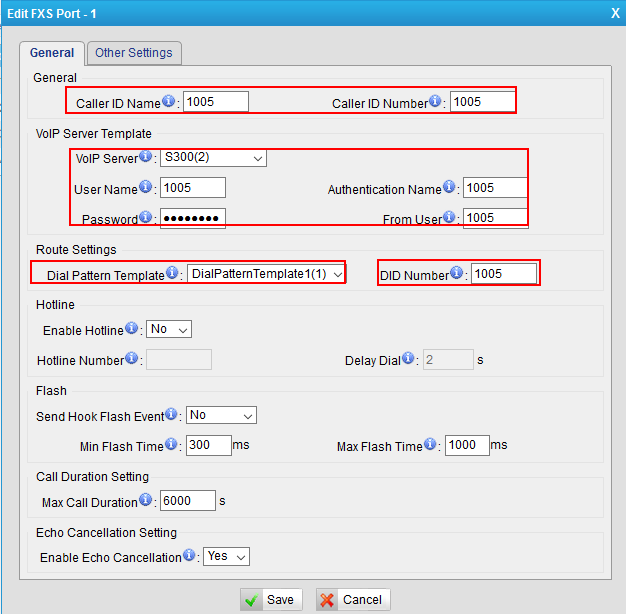
Figure 7. Edit the FXS Port
Caller ID Name: You can name the port whatever you want.
Caller ID Number: The extension number on S-series PBX, 1005
VoIP Server: Choose S-series S300(2), the VoIP Server Settings configured in Step 2.
User Name: The extension number on S-series PBX, 1005
Authentication Name: The extension authentication name on S-series IPPBX, 1005.
Password: The registration password of the extension on S-series IPPBX.
From user: The extension number on S-series PBX, 1005. And it is necessary to be filled, otherwise you may not pass the incoming call to analog phones.
Dial Pattern Template: Choose the Dial Pattern Template, DialPatternTemplate1(1).
DID number: The extension number on S-series PBX, 1005
Save and apply the changes, and you will see the port status is “OK” on Status> FXS Port Status.
Step 5. Crate an outbound in S300 and choose 1005 in the selected box
Path: Settings> PBX> Call Control> Outbound Routes> Add
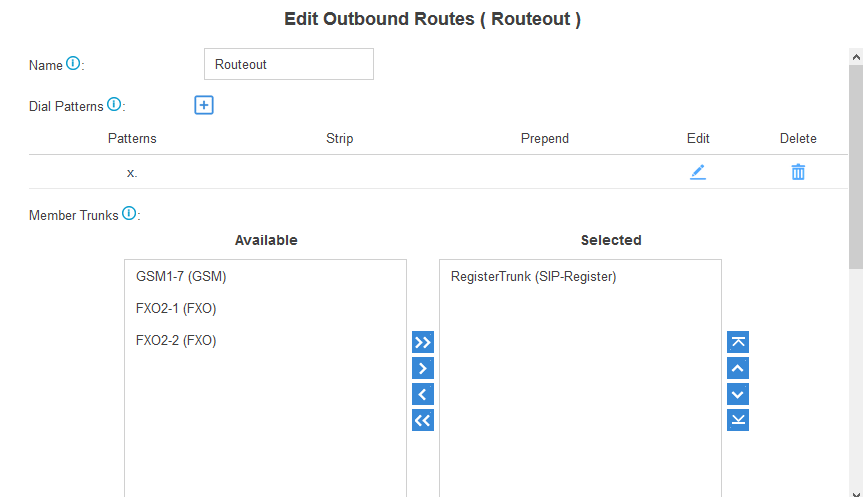
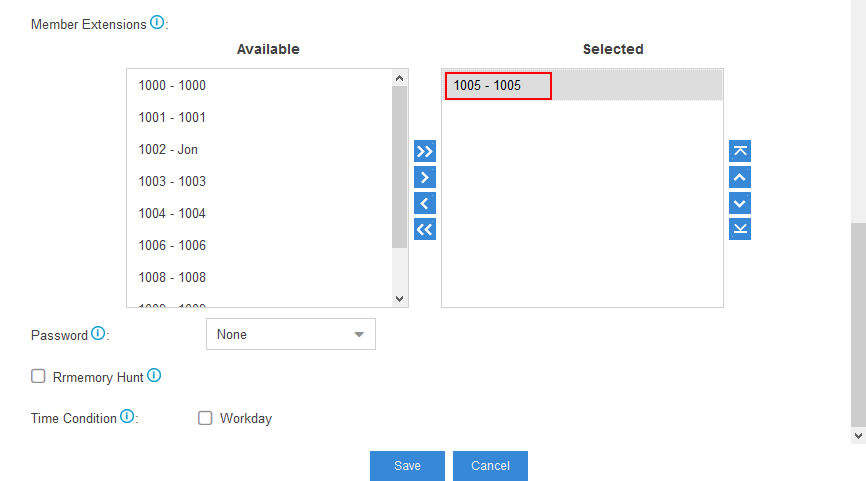
Figure 8. Edit the outbound route on S300
Step 6. Crate an inbound in S300 and choose 1005 as the destination
Path: Settings> PBX> Call Control> Inbound Routes> Add
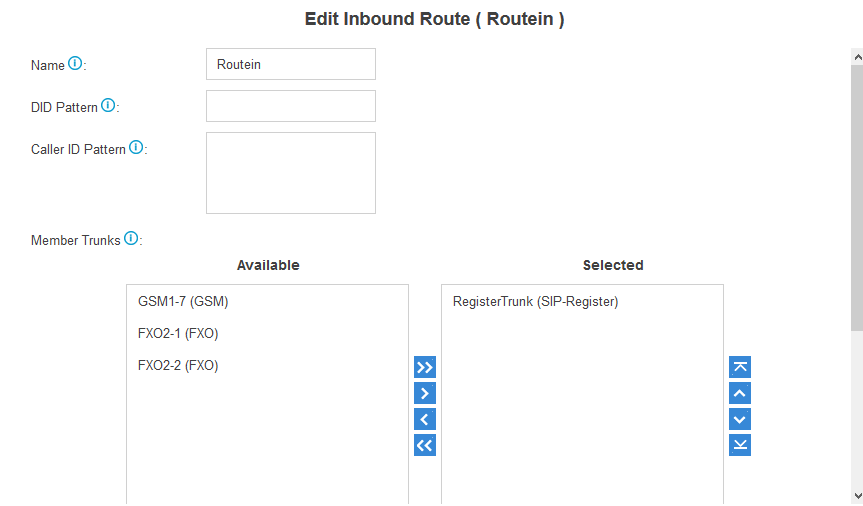
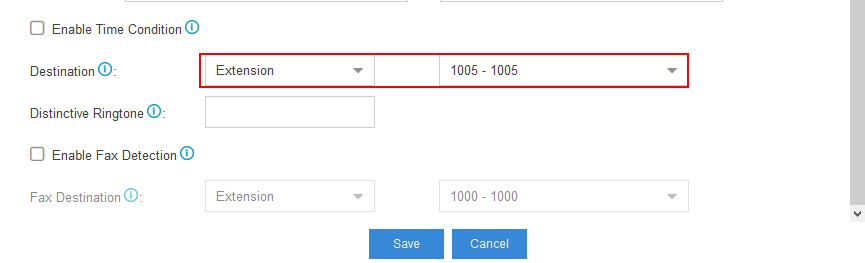
Figure 9. Edit the inbound route on S300
Now, you are able to use the analog phone which is connected to TA's FXS port 1 to make calls and receive calls.
Note: Outgoing calls to external numbers through trunks on S-series IPPBX all should match the dial pattern, or the calls will fail.
4. Service Provider Mode
If you choose this mode to connect TA400 and S-series IPPBX, the FXS port will be registered as a Service Provider SIP/IAX (SPS/SPX) trunk to the S-series IPPBX. One SPS/SPX trunk to TA also should also be created on S-series IPPBX. In this guide, we use SIP protocol, configure one VoIP Server Settings as SPS mode on TA400 and create one Peer trunk on S300.
Figure 10. Connect TA400 and S-series IPPBX via SPS Mode
Step 1. Create a Service Provider SIP Trunk on S-series IPPBX
Path: Settings> PBX> Trunks> Add
Figure 11. Add a Peer Trunk in S300
Trunk Type: Peer Trunk
Provider Name: TA400
Hostname/IP: fill in TA400's IP address, 192.168.9.64
Domain: fill in TA400`s IP address, 192.168.9.64
Save and apply the changes, we can check the status of this trunk, it should be OK.
Path: PBX Monitor> Extensions> Trunks
Figure 12. SIP Trunk Status
Step 2. Edit one VoIP Server Settings as SPS mode.
Path: Gateway> VoIP Settings> VoIP Server Settings
Figure 13. Configure the VoIP Server Template as SPS Mode
Server Name: S300
Type: SIP
Transport: UDP
Hostname/IP: fill in S-series IPPBX's IP address, 192.168.9.135
Domain: fill in S-series IPPBX's IP address, 192.168.9.135
Register Mode: Service Provider
Step 3. Edit the Dial Pattern Template
Path: Gateway> VoIP Settings> Dial Pattern Template
The default dial pattern is set as ".", which allows you to dial any number out. In this guide, we will remain the default setting. You can change it according to your environment.
Figure 14. Edit the Dial Pattern Template
Step 4. Edit the FXS port
Path: Gateway> Port List> Port List
Figure 15. Edit the FXS Port
Caller ID Name: You can name the port whatever you want
Caller ID Number: Give a number to the port whatever you want. The number should be different from the extension numbers on S-series IPPBX. Here we set number 333 for FXS port 1.
VoIP Server: choose S300(2), the VoIP server template configured on Step 2.
Dial Pattern Template: choose the Dial Pattern Template, DialPatternTemplate1(1).
DID number: Same as the caller ID Number
Note: You don't need to fill in any authentication name and authentication password on the FXS port edit page if you choose SPS/SPX mode.
Save and apply the changes, and you will see the port status is “OK” on Status> FXS Port Status.
Step 5. Create an inbound route in S300 to let TA400 make an outbound call using S300`s trunk
Path: Settings> PBX> Call Control> Inbound route> Add
If you want to make external calls from TA400 through the trunk on S300, you should create an inbound route on S300.
Figure 16. Add an Outbound Route on S300
Name: define a name for the inbound route, Routein.
Member Trunks: select the trunk connected to TA400, which is created on step 1, TA400.
Destination: Choose “Outbound Route”
Figure 17. Outbound Route "Routout" on S300
To make outbound calls from TA400, you should dial the number which matches the dial pattern on TA400 and the dial pattern on S-series IPPBX outbound route. In this guide, the dial pattern on TA400 is ".", which allows any number; the dial pattern on S-series IPPBX outbound route is "x." allows to dial any number.
Step 6. Create an outbound route in S300 to make a call from S300 to TA400
Path: Settings> PBX> Call Control> Outbound Routes> Add
To make calls from S-series IPPBX to TA400, you need to create one outbound route on S-series IPPBX.
Figure 18. Add Outbound Route on S300
Set the dial pattern as 3xx., choose the trunk "TA400" which is created above. In this guide, you should dial 333 to call the phone which is connected to TA400 FXS port 1.
5. Template Register Mode
If you choose the template register mode to connect TA FXS gateway with S-series IPPBX, which means all the ports on TA share one extension on S-series IPPBX. All the port from TA call out will show the specific extension number on S-series. And with the settings you configured below, the call to the TA will ring all ports at the same time if they are in the one hunting group.
Step 1. Create a SIP extension on S-series IPPBX.
Path: Settings> PBX> Extensions> Add
Create an extension on S-series IPPBX for the FXS port on the TA400 which has connected an analog phone. Here we take extension 1007 for example.
Figure 19. Create Extension 1007 on S300
Step 2. Configure one VoIP server settings on TA400.
Path: Gateway> VoIP Settings> VoIP Server Settings
Choose the “Register Mode” as “Template Register” and fill in the Hostname/IP and Domain as the IP of S300
Figure 20. Configure the Register Mode as Port Register
Server Name: S300
Type: SIP
Transport: UDP
Hostname/IP: fill in the S-series IPPBX IP address, 192.168.9.135
Domain: fill in the S-series IPPBX IP address, 192.168.9.135
Register Mode: Template Register
User Name: the extension number created on S-series IPPBX, 1007
Authentication Name: the extension number created on S-series IPPBX, 1007
Password: the registration password of the extension number
From User: the extension number created on S-series IPPBX, same as the User Name, 1007
Step 3. Edit the Dial Pattern Template
Path: Gateway> VoIP Settings> Dial Pattern Template
The default dial pattern is set as ".", which allows you to dial any number out. In this guide, we will remain the default setting. You can change it according to your environment.
Figure 21. Edit Dial Pattern Template
Step 4. Edit the FXS port
Path: Gateway> Port List> Port List
Port 1
Figure 22. Edit the FXS Port 1
Caller ID Name: You can name the port whatever you want.
Caller ID Number: Give a number to the port whatever you want. The number should be different from the extension numbers on S-series IPPBX. Here we set number 333 for FXS port 1.
VoIP Server: Choose S-series S300(2), the VoIP Server Settings configured in Step 2.
Dial Pattern Template: Choose the Dial Pattern Template, DialPatternTemplate1(1).
DID number: The extension number on S-series PBX, 1007.
Port 2
Figure 23. Edit the FXS Port 2
Caller ID Name: You can name the port whatever you want.
Caller ID Number: Give a number to the port whatever you want. The number should be different from the extension numbers on S-series IPPBX. Here we set number 334 for FXS port 2.
VoIP Server: Choose S-series S300(2), the VoIP Server Settings configured in Step 2.
Dial Pattern Template: Choose the Dial Pattern Template, DialPatternTemplate1(1).
DID number: The extension number on S-series PBX, 1007.
Step 5. Edit the Hunt Group
Path: Gateway> Port List> Hunt Group
Put the port 1 and port 2 to one hunt group
Figure 24. Edit the hunt group
Group Name: Name the hunt group
Strategy: The strategy of ringing the ports in the selected box
Ring Timeout: Ring timeout of the hunt group
Group Members: Choose the port you want it to the one ring group
Step 6. Edit the port again in the “follow me” settings
Path: Gateway> Port List> Port List
Go to the port 1 and port 2 to configure the “follow me” as “always” to hunt group. In this way when call 1007, the analog phones in port 1 and 2 will ring at the same time.
Port 1
Figure 25. Edit the other settings in port 1
Port 2
Figure 26. Edit the other settings in port 2
Step 7. Create an outbound route in S300 with 1007 selected
Path: Settings> PBX> Call Control> Outbound Routes> Add
In this way, when the analog phone on port 1 call to external users using trunk on S300 will show the number 1007 instead of 333.
Figure 27. Edit the outbound route on S300
Step 8. Create an inbound route in S300
Path: Settings> PBX> Call Control> Inbound Routes> Add
In this way, when the call goes to 1007, the analog phones on port 1 and 2 will ring at the same time.
Figure 28. Edit the inbound route on S300
0 Comments